
I have been wanting to work on my own personal set of kanzashi for a while, but I didn’t really have clear concept for it. So, up until now, I’ve mostly been working on traditional motifs, filling out my kanzashi calendar and developing my skill at kanzashi making. Finally, a few months ago I was struck with the idea to use skull cabochons in my kanzashi, and this set was born.
The funny thing is, I didn’t end up using any cabochons in my kanzashi.

I started out with the intent of making the set whimsical and cartoony, but after crafting the flowers I ended up with something more refined. I don’t think this is a bad thing; and I am intending on using the skull cabochons later on.
After coming up with a concept, I decided on a peacock-like color palette, mixed into shades of grey. I achieved the different shades by leaving the fabric in for different amounts of time – the darker pieces were in the dye bath longer than the light pieces. The blue-green, purple and greys are all new, but the yellow was leftover from making canola and narcissus flowers last year.

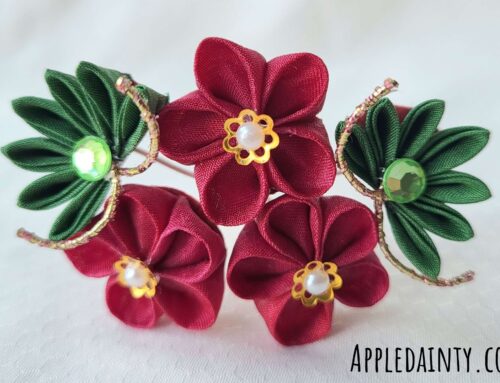
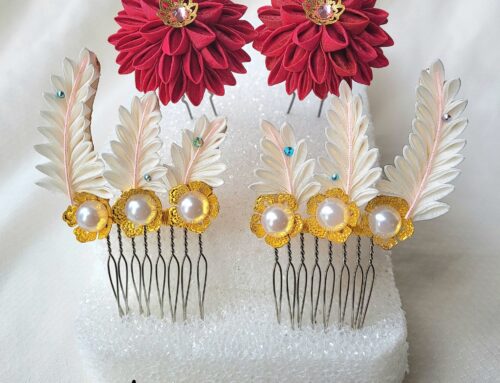
The single pins came first, and helped give me a basis for what I wanted the rest of the flowers to look like. I normally follow a pattern with my sets – two single pins, a medium size trio (three flowers or two flowers and a leaf, etc.) and a larger show piece. The trio for this set features came to me easily once I had the pins done; it features a multicolored two-layer chrysanthemum, a dainty five-petal flower and a purple bellflower-esque flower with mizuhiki detail.
I ended up making doubles of both the single pins, and the trio. Even though I think of this as my personal set, I felt that the designs were good and wanted to offer them in the Shop. I might even make a few more pieces along this theme in the future, just for the shop. Not sure just yet, but I still have plenty of petal squares left to work with. I’ll come up with something.
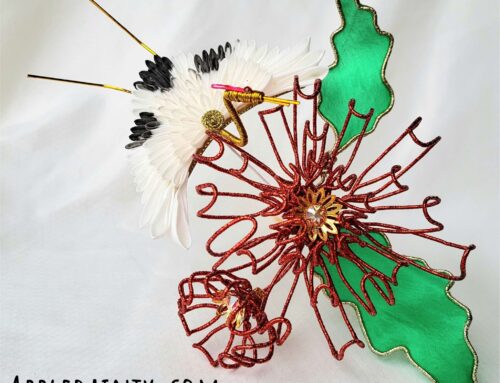
The last piece in this set is where I really struggled. I had originally wanted to make a large multicolored chrysanthemum. I even made the base piece for it. But, something was stopping me. I’d had some silver glitterwire in my hoard of craft supplies for a long time, intending on making a silver spider chrysanthemum from it – a traditional motif for the month of October. I thought a silver wirework spider chrysanthemum would be a pretty spectacular addition to this set, and eventually worked up the courage to try it.
Having never done a wirework kanzashi before, I had only a vague idea of how to start. I’m not really sure that the way I went about it is the traditional method, but I feel like I got good results. It’s a little difficult to explain in words, but I might do a tutorial with pictures later if anyone is interested. Actually, the wirework wasn’t too bad. My first attempt was good, but too large. I took that one apart and made it a little smaller.
It’s still quite huge – the chrysanthemum by itself is over 5 inches across. I don’t think I’d be able to wear it normally, but it definitely makes a statement.

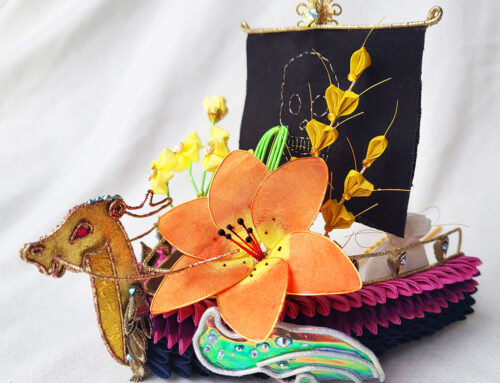
Once I finished the silver wirework, making the flowers to go along with it was easy enough. The really challenging part was actually the moth. I designed the moth based on a death’s head moth, which are famous for having a skull-like image on their back. The first moth I made was white, which I thought would be more skeletal looking. I hand painted it with black splotches to add an ink-blot type effect. But, after sitting on it for a day I realized it wasn’t working. So, I tried again with black shimmer cardstock.
I ended up making four different moths before finding one that felt right. I tried glitter, cabochons, and some other techniques before landing on cellophane for the wings, and adding paradise shine swarovski crystals and faux pearl details. I sometimes give up on something half way through if I feel like I’m struggling with it, or not starting on something at all if I’m feeling intimidated (even if I already have all the supplies, ugh). It was worth all the failed attempts to find the right one for this.


All in all, I feel like I learned a lot from this experience. I got to develop new techniques and use materials I’d never worked with before. I started with one concept and ended up somewhere different – but in a way, even better than what I’d originally imagined.
If you like my kanzashi and would like to own some for yourself, please feel free to check out my Shop. If I don’t have what you want right now, you can always shoot me a message and I can make you something special.
Anyhoo, that’s about it for this week. Check back next week for more art, crafts and cookery!
[…] One of those projects is new illustrations. I wanted to try and finish enough illustrations for a small sketchbook before Saskatoon Expo in September. I’m not quite sure I will get that far, but at least I’ll have lots of good material for next year. This new illustration features the main piece from my Memento Mori kanzashi set. […]