It has been very busy over here, though you wouldn’t be able to tell by looking at this blog or my social media! I’ve had a lot of projects in progress, and of course I was at Ganbatte Con the weekend before last. I wasn’t feeling very well in the lead up to Ganbatte Con, and didn’t have the energy to devote to promotion, but I finally finished a project this weekend that I can share with y’all today!
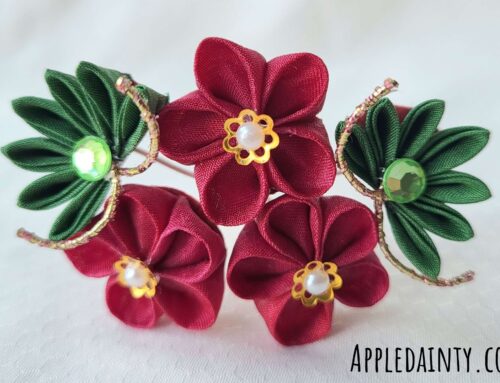
I don’t take on commissions very often, but I opened up a few commission slots in June for resin pieces. This client requested a white orchid with pale fuschia center, accompanied by a fern frond. I learned a lot with this piece, as I wanted it to have two tones and a tougher exterior than the dip flowers I’d made previously. To achieve this, I used a combination of many coats of powder pigment for the silvery white base color, and tinted UV resin for the fushia tone and clear coat.

I purchased my UV resin from Miniature Sweets HK. I also get a lot of my pigments from this website. They have relatively fast shipping and always include lots of little extras. I’m not receiving any kind of kick back for promoting them, I just like what they offer and am recommending them because they provide good service.
The instructions say it should take maybe 6 minutes to dry a coat of UV resin, but in my experience it took more than an hour. Not sure if it’s because my light wasn’t strong enough, or the resin was too thick, but there you go. I got a nail dryer style UV light from Amazon, as well as a torch style light from Miniature Sweets HK. I tried the torch first, and that didn’t seem to do much, or I thought it would be annoying to have to sit there holding the torch forever. So, I swapped to the nail dryer and created an ‘oven’ effect by lining the bottom and sides of it with tin foil. I thought this would help reflect the UV light back onto the drying pieces. It definitely seemed to do the trick, but it still took much longer than instructed for the resin to dry.
When it did dry, it created a lovely hard shell over the top of the petals. I feel like these petals will hold up much better to wear than the dip flowers I produced previously, which were coated with the manufacturer’s recommended varnish.

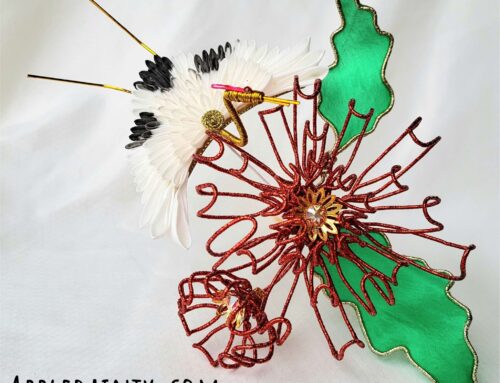
I have not made a fern frond previously, but I felt I didn’t think it was outside my capabilities. What I always think of when I think of ferns is the small round spores, or soris, on the back of fern leaves, so I knew right away that I wanted to have those reflected in my design. I thought about doing individual leaves to recreate the kind of serrated edge of the fern, but in the end I decided to simplify with flat wire and fabric leaves – as it would be easier to adhere the soris to a flat leaf.
I am very pleased by the effect of the sori silhouettes being visible from the front side of the leaf. I’ve always been fond of polka dot patterns (as well as stripes), and although I was sure they would be visible, I was concerned they might show up too strongly. I used simple plastic rhinestones from some nail art kits I bought ages ago to create the sori, stuck into place one at a time with jewel glue. I actually started out with green rhinestones, but realized I didn’t have enough and had to remove those and start over with clear – but I think the contrast of the green leaf with the clear rhinestone actually works out better.
This must be what Bob Ross meant by happy accidents.
The last thing I did was adhere the aqua/peach swarovski rhinestones to the orchid petals. I originally tried some round water droplets that I picked up from Miniature Sweets HK, but since they aren’t flat backed I had a hard time adhering them and went with my usual rhinestones instead.
I also have some plastic rhinestones that are actually shaped like teardrops, and I’ve used them for a few projects, but I’ve always felt they look a little kitschy. I think they might look better embedded in something rather than used as a onlay.
All in all, I think this piece turned out well. My client is happy with it, and I’ll be shipping it out later this week – I just need to track down an appropriately sized box.
Anyhoo, that is all I’ve got for this week. I hope to see you at SaskExpo in September, or back here on the blog next week! If you like this blog and want to help support it, consider buying me a coffee. Your support is greatly appreciated, and I hope that you check back again soon for more art, crafts, and creativity.